
cshimokita
[Photo Forum Moderator]
10714

Exposure Profiles... just getting started
We all use some method to determine the appropriate exposure when taking photographs, for the most part the choice is a camera internal light meter or maybe an external handheld light meter... for the few (and I know who you are) that estimate the light via the 'sunny 11' technique, well... your profile is based on experience 
Back in June 2014 I did a post about measuring the light, I also introduced my preferred meter, the Sekonic L-758D 1° spot meter / incident meter... It's simple in theory... measure the light and take the photo
Now I would like to carry on from that post and introduce exposure profiling. In summary a simple light meter will give you an exposure suggestion based on average scene reflectance or the quality of the light striking the scene. Again, there is no one correct exposure... in the end, it's up to the interpretation of the photographer.
So why go to the trouble of creating a camera specific profile and loading that into a 'smart' handheld light meter (such as the Sekonic L-758D)? According to Sekonic, the reason is two fold:
01) The profile can be used to display on a light meter the unique dynamic range and clipping point of the digital camera you are using.
02) To display more accurate exposure values on the light meter. Light meter profiles record unique variations in the camera, lens shutter speed, aperture, etc. and reflect that in the exposure display.
Here's the basics on how it works and what equipment I am going to use for this test...
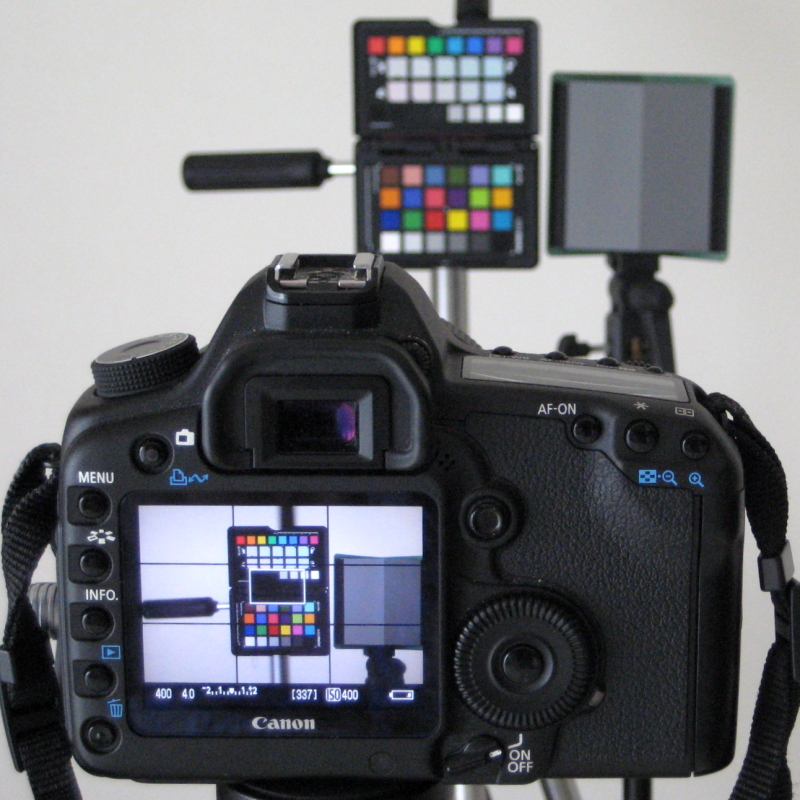
a) make a series of test exposures using a digital camera (Canon 5D Mark II) and an exposure profile target (x-rite ColorChecker Passport)
b) create a camera specific exposure profile based on the test exposures (I am using Sekonic's Data Transfer Software to create the profile)
c) transfer the profile to the light meter (Sekonic L-758D)
d) in theory the camera specific clipping points and dynamic range information that is displayed on the light meter can be used when setting the exposure (i.e. it's still based on the interpretation of the photographer)

A word about Sekonic's Data Transfer Software (DTS)... When creating a profile, there are three options: Quick, Advanced, or Manual. The Quick Mode uses test shots for a single light source (ambient or flash) and a single ISO setting, Advanced Mode lets you enter both types of light source and multiple ISO settings... Manual Mode is just that...
In order to get familiar with the software and test exposure process, my first profile was with Quick Mode. The plan is to create a camera specific profile using Advanced Mode with data based on both ambient & flash as well as multiple ISO settings (200, 400, and 1600 as a minimum).
A word about the x-rite(c) ColorChecker Passport. To be honest this was a bit of a compromise. I already had the ColorChecker Passport, but it's actually a bit small and doesn't have the Sekonic Gray Card. DTS can accept test shots from the Sekonic Target (Exposure Profile Target or Exposure Profile Target II) or the X-rite target (Classic, Passport, or Mini). The Sekonic Targets are a bit expensive, but according to some user reviews, do give "improved" results (I haven't tested the Sekonic Targets).
Quick Mode test exposure details...
- Set up for ambient light. I will do flash light source texting as a next step... for that I will use two Nikon Speedlight SB-28 with SMDV Flash Wave-III trigger/release.
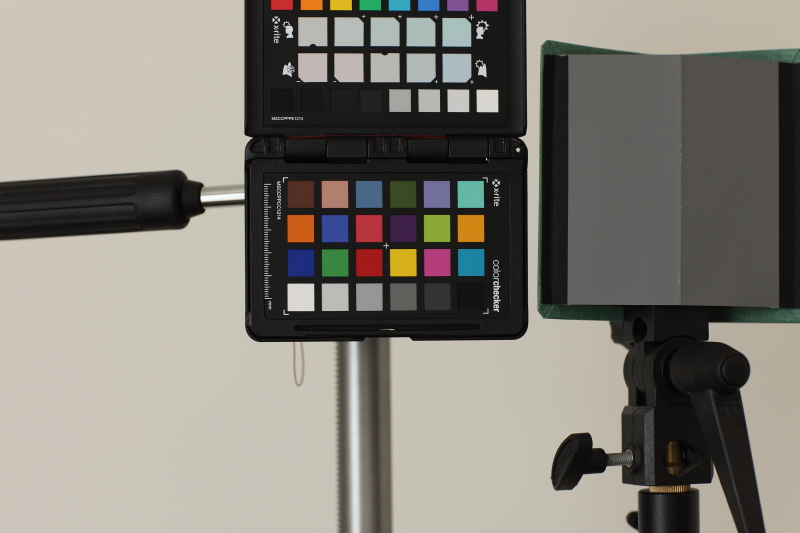
- I used a stand alone Sekonic Gray Card to set the custom white balance.
- Meter the gray card in both incident and reflective mode and record the results to one decimal point (e.g. f/4.0.1)... Note to self: set the meter to record whole stops rather than 1/2 or 1/3 stops.
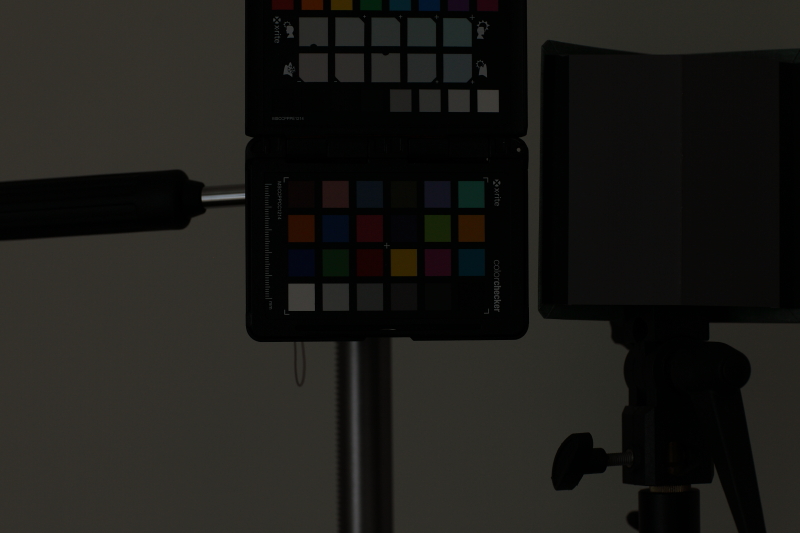
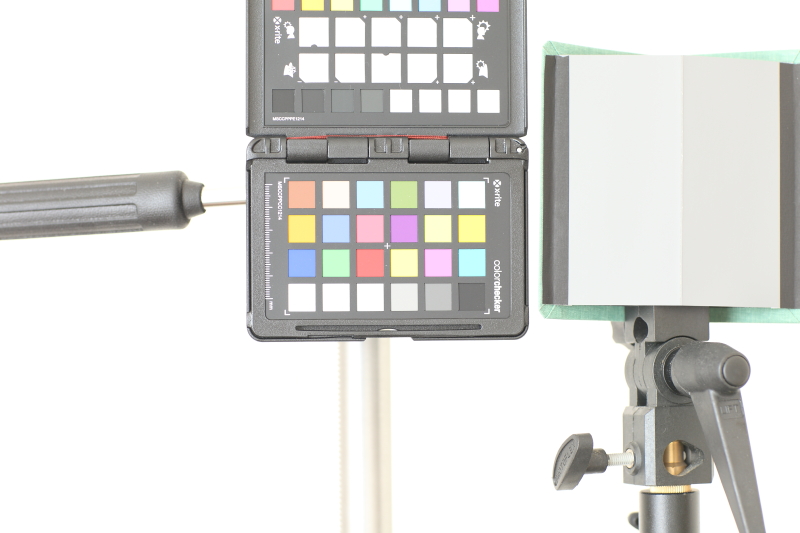
- Expose the "base" shot using the incident reading and one test shot each at +/- 3 EV (e.g. 1/3
0, 1/250, 1/4).
- The f-stop should be three full stops above the maximum (e.g. if f/1.2 is the maximum... f/1.4 the largest standard f-stop, then use f/4 for all three shots). The software only accepts standard f-stops and shutter speeds.
- Below are the three exposures...
Next, enter the data and test shots into the DTS software and create a profile... here are my results from yesterday in graph format...
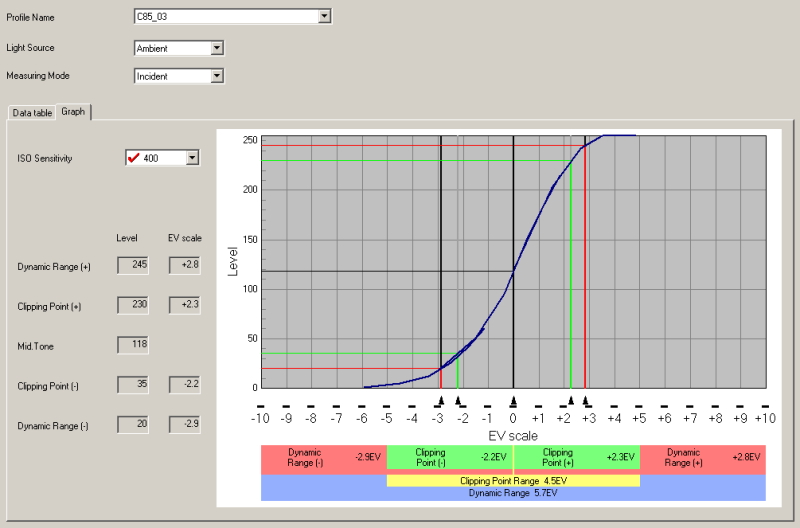
My interpretation of the results... "good start", but I would like to fine tune the process and do an Advanced Mode profile. It's really a sensor evaluation and I would think that the Canon 5D II would do better in the profile... in fact I have seen the results from the same camera using a Sekonic Target and the results were much better... so either my technique or the target or ... It's a poor workman that blames the tools, but my camera's battery was getting to the red zone as I finished my test yesterday
Will I continue... yes, I think the process is valuable for a couple of reasons... I want to test different cameras as the comparison is useful, if not the specific results. More importantly I want to raise my awareness about the technical aspects of the photo process... hopefully to improve my ability to work with shadow detail. Yes, it is content, content, content... but incremental improvement regarding the technical aspects are also of interest...
Thanks for reading,
Casey
Exposure Profiles... just getting started
I had no idea this was possible.
Have to test with film...

Fascinating Lightmeter
Sekonic C-700R SPECTROMASTER
Only kidding around about the C700R, he can't afford it