
AndrewD
[HoMe Moderator]
12829

Homemade desktop clock
Martin (Stromer) posted this fantastic desk clock made from an old computer hard drive on this week’s WristScan thread [click here for the original post] and I wanted to share it with you on HoMe in case you missed it …
My home made desktop clock
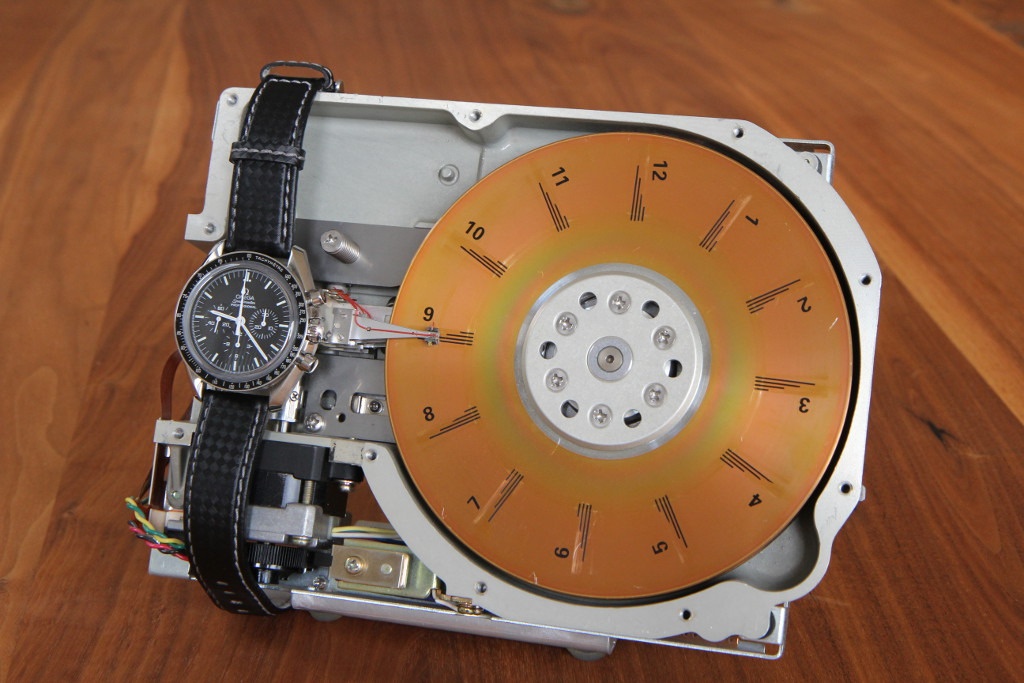
I got my hands onto this old hard disk about 20 years ago and the idea struck me to convert it into a clock with as little visible change as possible.
Unfortunately I had overestimated my electronic skills back then and so my first attempts using discrete ICs ended up in frustration. I put it aside and kept it in the drawer for years until I met the husband of my wife's friend who turned out to design electronic circuits to earn his living. We soon became friends and when I asked him he taught me all I needed to know and even provided me with a microcontroller development environment.
So about 10 years after the first attempt I got the thing working.
How it is read
It is very basically very simple:
The hard disk indicates the hour while the read/write head serves as the "minute" indicator by moving from the outer to the inner edge of the disk. Well, you may only estimate the correct quarter hour from the position of the read/write head, but I don't care about that.
At the full hour the disk turns by 30 degrees to the next hour marker and the read/write head returns to the the outer edge. By doing so the stepper motor emits a quiet, humming sound that reminds me that another hour has passed.
This is what it looks like at 8:59 :

At 9:00 o'clock :

And at about 9:30 :

This clock has been running for about 12 years now and you can clearly see the marks that the read/write head left on the turning disk and while moving in and out.
How it is operated
The time is set by turning the disk and setting the read/write head to the desired time by hand. Then you push the reset button on the back (the upper one of the tree on the back) and the clock measures the position of the indicators and sets its internal electronic quartz clock accordingly. For measuring the hour I painted a binary pattern onto the backside of the disk which is illuminated by infrared LEDs and detected by matching infrared light sensors.
For detecting the set minute the read/write head is driven to the outside of the disk until it interrupts the a light barrier. The steps necessary for that are counted, the internal clock is set and the head is driven back to its previous position.
Because the current time is stored in an internally the time display can be restored if it was changed by accident. This does the middle button on the back. Pushing it will turn the disk and move the head to the correct position.
The lowest button on the back side turns on "demo" mode. This makes one minute of internal time pass in 2 seconds real time so that you can easily watch the thing working. This was very useful during development to test things out thoroughly.
How it looks from behind
The electronics is hidden on the backside. I finally decided to build it based on a ATMega16 Microcontroller. It is larger that it would have been necessary for the task of controlling a clock but it offers a galore of input/outout pins that came very handy. A microcontroller, stepper motor driver (which is used to driver the hard disk motor because that pulls a lot of current due to the weight of the disk) and some transistors for amplifying the signals sent by a set light sensors that is hidden under the disk and measures its position.
I tried to "respect" the original disk and to reuse as many of the present parts as possible. E.g. every 12 hours the read/write head goes all the way back to the outside of the disk (beyond the 0 minutes position) to meet the original light barrier and to verify/calibrate its correct position.
A pleasant thing about ATMega controllers is that they can be programmed using the C programming language. So today I can still understand the software I wrote back then to control the clocks functions ;-)
Here it what it looks like on the backside:

I even kept the drawing that I used to design the layout of the circuit board and to transfer it to the backside of the real board. Because it needed to be mirrored to backside it is on a transparent slide.
(I will spare you to post the source code for the microcontroller too  )
)

Today I am thrilled by the fact that it has been running flawlessly for the past 12 years and still does. I really had not expected that.
But more than that I enjoy it as a very personal piece that has become possible only by meeting the right man and that we are still friends today.
Martin

Homemade desktop clock

I love it !

Hi Don,

Great work
Thank you Mark

Amazing, my creative friend. If I had your skill, i would know what to do
I am afraid
It does not have to be about electronics.

Great Idea Martin!
Electronic devices at IGOTT?

Saw it on WS

