
skyeriding
901

How to: Resize a Grand Seiko 5-link Bracelet (SBGA011) - Pin-Collar type
So, you have just acquired your shiny new Grand Seiko on a bracelet. However, it is a few links loose/tight and you'd like to change the number of links (Unfortunately, the non-diver GS bracelets do not have a quick adjust mechanism). How would you do that yourself if say, you don't have a watchmaker within your vicinity?
This is a guide on how to resize specifically, Grand Seiko Pin-Collar type bracelets (or at least, the way that I do it). The example I’m using here is the SBGA011 “Snowflake” - I believe that the Pin-Collar type is used for Titanium GS bracelets, while the steel types use screws instead.
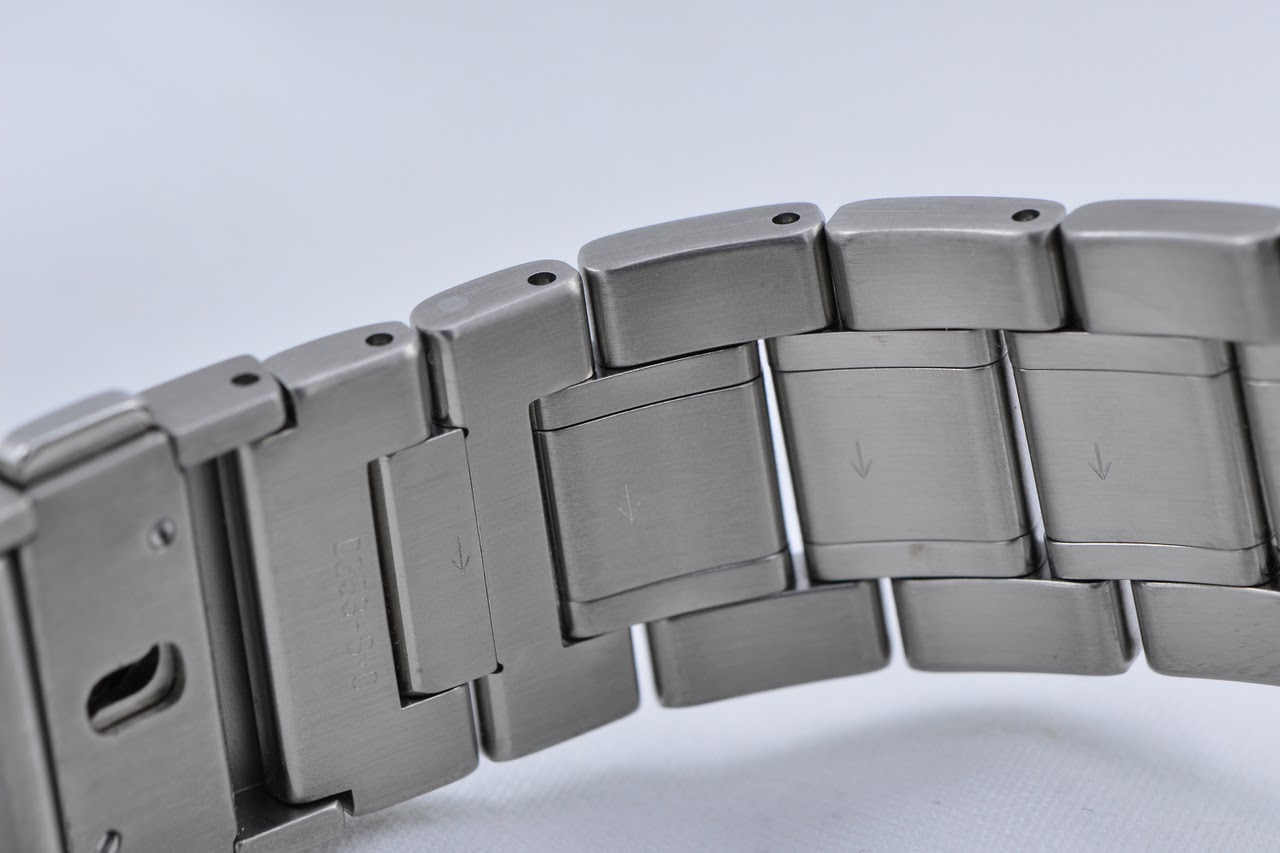
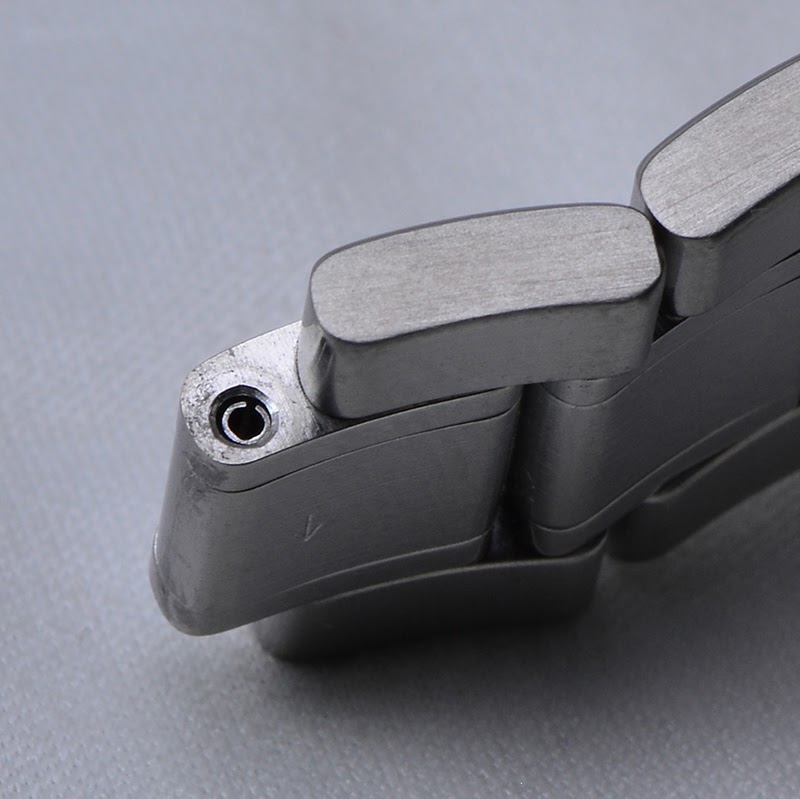
Here is how the Pin-Collar type bracelet looks like. You can see holes visible on some links on the sides - there are no screws. Screwed bracelets are much easier - you only need a jeweller's screwdriver without additional special tools (rest of steps should be referred to in another guide).
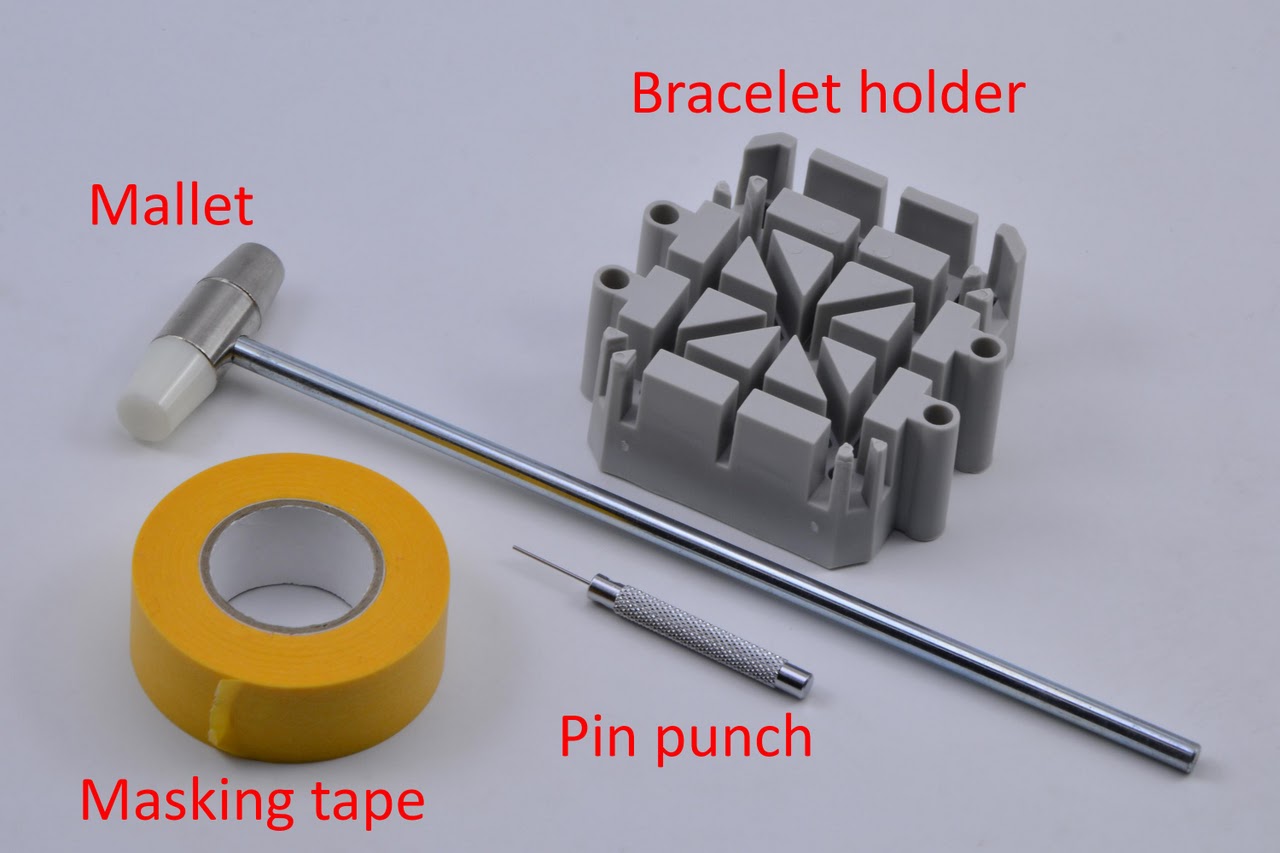
To begin with, let’s start with a quick overview of the tools required:
- A pin-collar bracelet watch (of course!)
- A bracelet pin remover holder/jig (the grey block with many cutouts in it). This holds your bracelet firmly while you work on it.
- A pin-punch. This pushes out the pins holding the bracelet.
- A mallet. The one I have has a steel tip on one end with a softer nylon tip on the other.
- Masking tape. This protects the watch’s surfaces while working on it to avoid scratches. I personally use hobby tape used for plastics models, but painter’s tape should do the same. You want tape that is not sticky enough to leave behind a residue, otherwise you’ll have a bad day cleaning the gunk up.
Before we proceed, it is best to understand the construction of the bracelet. The bracelet consists of individual sections of assembled “links” - a “link” being a centre link surrounded by two outer links (that cannot be disassembled further). Each link joins to the next via steel(?) pins (blue) which allow each segment to rotate freely to each other. What holds the pins from simply falling out of the ends is a collar (red) that sits inside a recess within each centre link. The pins are friction-fit into the collars and therefore can be removed via force by pushing it through.
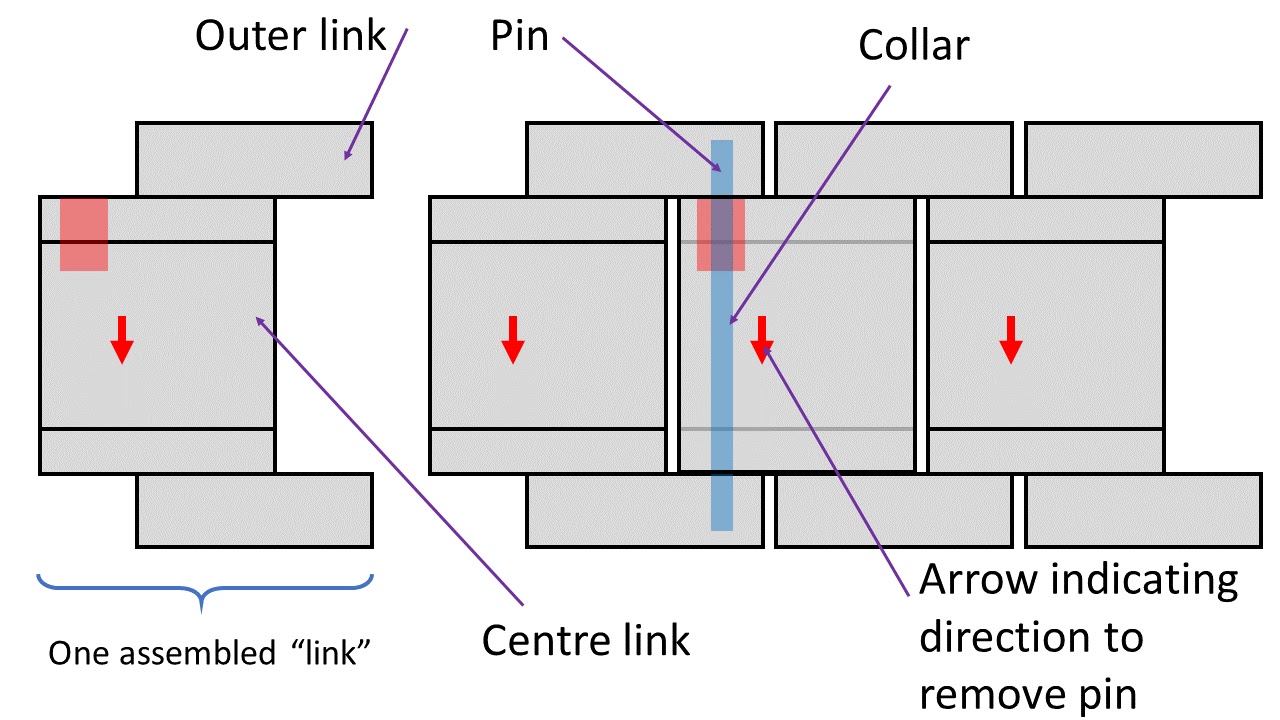
Removing a bracelet link
The following series of diagrams demonstrate the general process of how to separate a bracelet link:
In summary, the idea is to push out the pins via a little force. In contrast, for a screwed bracelet the pins are usually threaded on one end and simply screws in - thus, only needing a jeweller’s screwdriver to change.
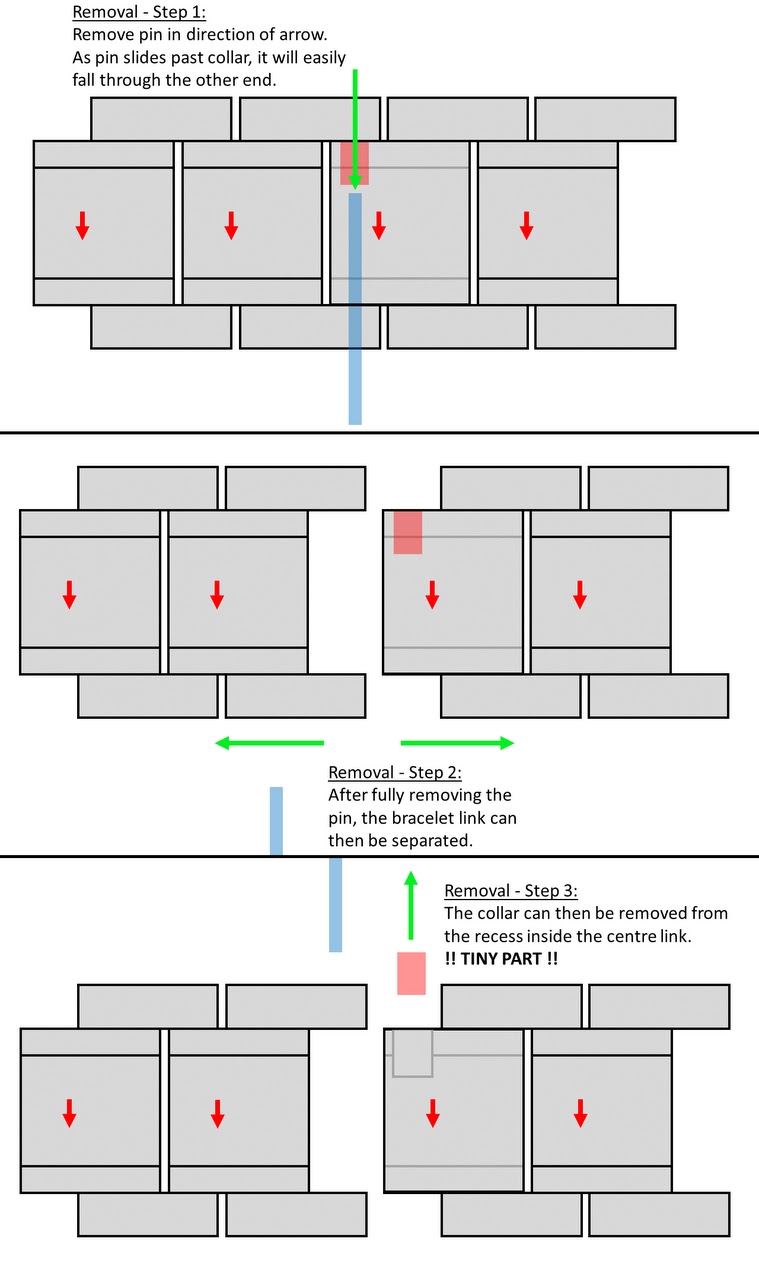
On the back of the centre links, notice that there is an arrow. As a reminder, this indicates the direction to remove the pins. That is where the pin-punch tool comes into play - it is narrow enough to fit into the hole to push the pins out from one end to the other.
Wrap the bracelet in masking/painter’s tape. This will prevent any accidents in scratching any parts of the bracelet while doing this work. Note that I did all this without removing the bracelet from the actual watch first - for that, I let the watch itself rest on a microfibre cloth to prevent any knocks. Note that you can never be too careful, and accidents can always happen . Thus, better be safe than sorry as you cannot un-ding or un-scratch your mistake if it happens.

I purposely left a hole in the masking tape to allow the pusher tool to fit through. Rest the whole bracelet into the bracelet holder. Note that you want to align the bracelet with the holes in the base of the holder, so the pins will simply fall through the other end.
Next, take the punch tool and carefully, place it exactly perpendicular to the hole it is meant to be in. Do NOT accidentally angle it slightly off, otherwise you risk scratching the edges of the hole or running off across the surface of the bracelet (this is where the masking tape acts as a safeguard). For demonstration purpose I did not show in this picture, but you should be holding the punch between your fingers (index and thumb at least) in one hand, while your free hand uses the mallet. As I’m right handed, I hold the punch with my left hand and the mallet on the right.

Lightly tap the tool first to get a good feel of the stroke you need to execute, then slowly tap with increasing force till you get the right amount that you feel the tool starts pushing in. That is the force you need for the pin to overcome the friction of the collar. With a few more taps, the pin will simply slide through the collar and drop free through the other end.
In my case, since I applied tape through the entire bracelet, the pin pierces through the other end of the tape and is held by the remnants of the tape. This also prevents the tiny pin from rolling away or off the table, disappearing to oblivion to the floor…
Notice in this picture you can also see the holes in the bracelet holder. That gives the space for the pin to fall through - otherwise, the pin will simply hit the bottom of the holder with no room to go. You can see that this is the other side of the bracelet which the pin has been pushed through.

With the pin removed, the links can finally be separated. Be aware that you still have the collar inside the centre link! The collar is a very tiny cylindrical (steel?) piece that is only a few mm in size. One sneeze and you may be spending the rest of your time on ebay sourcing replacements…
And that's it! You now have one pin removed and the bracelet separated. To shorten or remove links, simply repeat the steps above on the pin holding section that you want removed.
The pin punch tool shown here, together with the extracted pin and collar. Notice how tiny they are (the pin is under an inch long):

Reassembling the bracelet:
Now, to do everything backwards and to join back the bracelet. In my case, I removed 2-3 links as the default configuration is too long for my wrist (6.5”). Hence, I removed the two respective pins, removed the 2-3 link section and join back the remaining two ends of the bracelet.
Overview of everything, now in reverse:

Before putting back the bracelet, remember to insert the tiny collar into the hole!
Also remember that because we are doing everything backwards, the arrows on the back of the bracelet should be pointing up , so you will have to insert the bracelet into the holder backwards compared to before.
To make it easier, I realign the bracelet ends together by temporarily inserting the pin halfway (not going through the collar). Then, masking tape is applied to affix the position of both ends of the bracelet. As before, I applied masking tape generously on the sides and edge of the bracelet that may come into contact with the holder just to prevent damage.

Using the nylon side of the mallet, gently knock the pin in directly until it is near-flush with the bracelet surface. The remainder still has to go in a little more - that will need the help of the pin punch tool.

Using the pin punch tool, carefully align it once again aligned straight on the pin and drive it in gently using the mallet a couple of times. Keyword here: GENTLY , as you do not want to “over-shoot” the pin too far in as it will stick out the other end instead. The idea is to just drive it in to approximately the centre of the bracelet.

Voila, you now have a resized Pin-Collar bracelet for your Grand Seiko! This is my first experience with a bracelet watch, and I think I'm already spoilt by the great quality of the finish and lightness of the titanium!
Thank you for reading.
Regards,
skyeriding
[Reference article: https://www.uv.es/ferorgar/fer/seikos/seiko_archivos/A&F%20Bracelet%20Sizing%20Tool.htm]
How to: Resize a Grand Seiko 5-link Bracelet (SBGA011) - Pin-Collar type

Thanks for this spectacularly illustrated procedure for changing bracelet length!
Thanks Cazalea for the insightful comments,

Another tips...