Kong
[Moderator]
7855

The Making of the Dresdener Regulator, Part 1 of 4
After interviewing our self-taught watchmaker-cum-Moderator, Don Corson last September (click here to access) to find out what inspires and motivates him to hand-make his own watches, we feel a continuation of seeing the construction of the watch from start to finish would complete the discovery journey.
Today, many new watchmakers do not usually perform the full work scope of watchmaker, from designing to working with the metals to hand-fabricate the components, assemble and test the timepiece. Due to the demand, industrialization process has to be implemented and current watchmakers tend to be watch-technicians, only assemble the components and test the timepieces.
It is only thrilling when Don agrees to share with us the making of his new watch so we could join him from the gestation to the birth of his new Dresdener Regulator.
We will approach in multiple parts starting with the .....
Conceptualization
Don : "The first watch was to have the form of the windows in the old buildings in Neuchâtel. At the time, I was changing trains there every morning and evening, and I got to really like the town. As it turned out, there is little resemblance to a window as I couldn't decide to make the watch non-symmetrical, top and bottom, like a window is in reality. A future model may well be such a non-symmetrical watch, really like a window; it would be somewhat larger too.
The second watch for my wife was to have female curves using essentially the same movement as the first. I think its "figure 8" shape is very satisfying, and the mother-of-pearl dial with gold hands is very successful. But I didn't realize all the problems the figure 8 shape would bring with it. I’ll just mention cutting the glasses as one of the problems, but sometimes it is good just to dive in.
The third watch, the Dresdener Regulateur, was inspired by a pocketwatch made by Seyffert from Dresden in 1807. A triangular regulator, with the seconds above and the minutes and hours to the right and left, seemed to me to be the natural next step after my first watches had the seconds above and the minute and hours below on one axle."
Starting with pencil and paper, Don will sketch out various designs with proper proportion. After which he transfered the sketches to the CAD (Computer Aided Drawing). From the CAD, visualization is easier and more accurate.
After that he proceeded to workout the movement.

A few of Don's computer renderings of his new creation ...


After completing the design and compiled the Bill of Materials (BOM), he proceeded to purchase materials.
Once the materials were in his atelier, fabrication began....
Fabrication

It starts with just two stress released brass blanks for the plate and bridges.

Those blanks get riddled with holes, a total of 101 holes in 19 different diameters.

Some of those holes are then threaded...

Then a little lathe work to remove the excess metal...

It is like making a sculpture, hammer and chisel, just remove the material that doesn’t belong to
David and leave the wanted.

Preparation of the steady pins ....

To keep everything in its proper place, steady pins are pressed fitted into the designated holes...

The bridges (up till now were in a single piece of material) were cut into individual pieces.
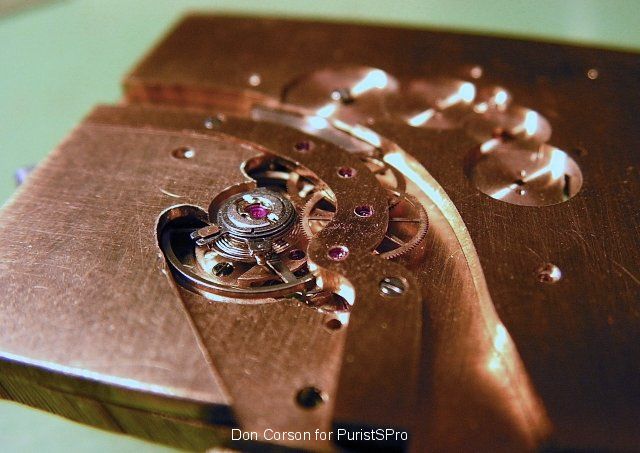
After fitting the jewels, the train wheels were first mounted.

Next is to fabricate the anchor bridge, drilled all the holes and milled the top side.


After milling the bottom side, turning out the part.

The anchor bridge.

Here you can just see the anchor bridge jeweled and mounted under the balance wheel.

Drilling the stem hole...

Before we can mount the winding train we need to make the wheel studs. Above is turning the stud
from a brass rod…

drilling the screw holes…

and making the countersinks to finish the stud.

Now the studs are mounted. Only the ratchet wheel is to be added.

On the dial side the keyless works has been made and assembled ...

the motion works held in place with the cover.

Now that the movement is fully assembled and works, the next step is decoration.
Before the decoration process, the components were disassembled....

All the steel parts that have been pressed into the plate, such as the axles were removed
otherwise they will be destroyed during the process of plating...

The bare plate and bridges.
The next part is the decoration of the movement.
Stay tune!
Please click here for Part 2
This message has been edited by AnthonyTsai on 2009-02-27 13:20:48 This message has been edited by AnthonyTsai on 2009-03-04 08:41:48
Added link to Part 2
This message has been edited by Kong on 2009-03-05 22:56:23 This message has been edited by Kong on 2009-03-19 10:25:22

The Making of the Dresdener Regulator, Part 1 of 4
Please click here for Part 2 Please click here for Part 3 After interviewing our self-taught watchmaker-cum-Moderator, Don Corson last September ( click here to access) to find out what inspires and motivates him to hand-make his own watches, we feel a co...

Thanks for the step by step report Kong
It's fascinating to see a work-in-progress and can't wait to see the decoration report. Question for Don, the drilling machine you use to drill 101 holes, is this machine hooked up to a computer so it drills the holes for you? Or do you manually adjust th...

Positioning
I do the drilling on my milling machine. It has an XY table so it is no problem to position the holes if you take some precautions. For my first watches the positioning was by hand, now I have added CNC to the machine. The computer control needs to use th...

CAD Software
I found this post really interesting! I would like to try a similar project I and have searched for suitable CAD software. I'm quirius to what you are using and if it comes with a library of movement parts or if one has to define every wheel/toohing etc b...
Fantastic post, an inspiration to all who aspire
It can't be understated just how rare people like Don are for even attempting this, to make their own watch- let alone succeed. I myself have wanted to do this for years, but have been trapped in place so remote so as to have no hope of tools. Perhaps in ...

Turning & jewels
Hi Ophiuchus, Working on the face place with the workpiece off center there is, of course, some unbalance when turning. But the turning speeds are pretty slow and in general it doesn't cause a problem. Note also that although there is often talk of all th...
Facinating. I would love to see how the wheels and gears are produced (stamped?)..
looking forward to part 2...


